

Kaltura Tutorial
What is Kaltura?
Kaltura is an out-of-the-box extension in Canvas that allows users to view, record, upload, publish, search, and share videos directly within Canvas. It is a video-managment extension that work with two tools in Canvas: "My Media" and "Media Gallery". Users will be able to add migrated Echo360 videos into Canvas course sites, upload videos and have access to them in Canvas, schedule lecture capture in classrooms that have been equipped for that use, store videos on the computer using Kaltura Capture, and much more.
My Media

The "My Media" section in Canvas is your private area where you can manage, view, and edit your videos. In the "My Media" section of Canvas, you will find:
- All Echo360 videos are automatically moved to Kaltura by July 2018.
- All WebEx recordings are automatically moved to Kaltura by July 2018.
- Any Zoom Meeting recordings you saved to the Zoom cloud will be moved to Kaltura within a day of the meeting.
- All future Kaltura videos that you upload. These videos may take a few minutes to upload.
Media Gallery
The "Media Gallery" section in Canvas hosts all material shared in a Canvas course.
- From "My Media" you can select which videos will be available in "Media Gallery".
- You can also upload videos directly to the "Media Gallery".
NOTE: If you do not see "My Media" or "Media Gallery" on your Canvas course, you will need to add them to your Navigation. To do that, go to your Canvas course, click on Settings, then the Navigation tab at the top of the screen. Scroll down to the bottom of the screen where your disabled pages are, click and drag the "My Media" and "Media Gallery" options to the top list. Finally, click Save button to save the changes made.
Kaltura videos can also be accessed at the MediaSpace video portal by Kaltura. From this website you can search for any published video from Virginia Tech.
In order to add videos to Kaltura and Canvas, you will need to be logged in to your Canvas site.
1. Once logged into Canvas, go to "My Media"
2. In the top right corner, click "Add New"

3. There will be a drop-down menu that shows multiple options for uploading video
4. You can choose any of the following:
- Media Upload: this option allows you to upload a video from files saved to your computer
- Express Capture: allows you to directly record yourself using your webcam (requires Adobe Flash)
- YouTube: you can use a video URL from YouTube to link that video to "My Media"
- Kaltura Capture: if you don't already have this downloaded to your computer, this will prompt you to download (more details below)
- Video Quiz: using a video alreay in My Media, you can add quiz questions at any time in the video
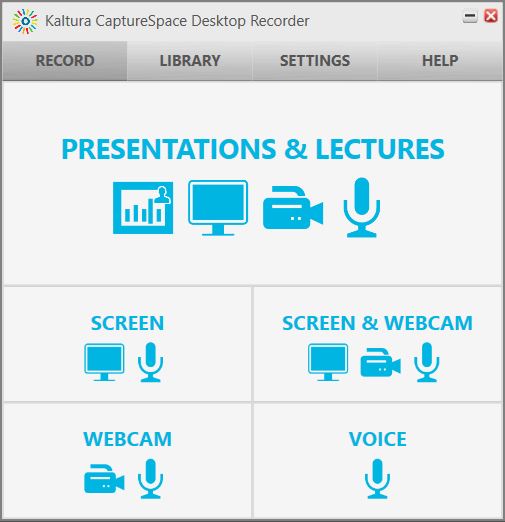
Kaltura Capture
1. In "My Media", click "Add New" -> "Kaltura Capture"
2. If not downloaded and installed, do so now
NOTE: The initial launch of the Kaltura Capture Desktop Recorder client MUST be done via the website
3. After launched from the desktop, there should be a window that gives you recording options
- Presentations & Lectures
- Screen
- Screen & Webcam
- Webcam
- Voice
1. In "My Media", next to the magnifying glass, click on "Search My Media" and start typing your search term(s)

- Kaltura searches through video names, any tags, and the captions for your search terms and automatically returns the results
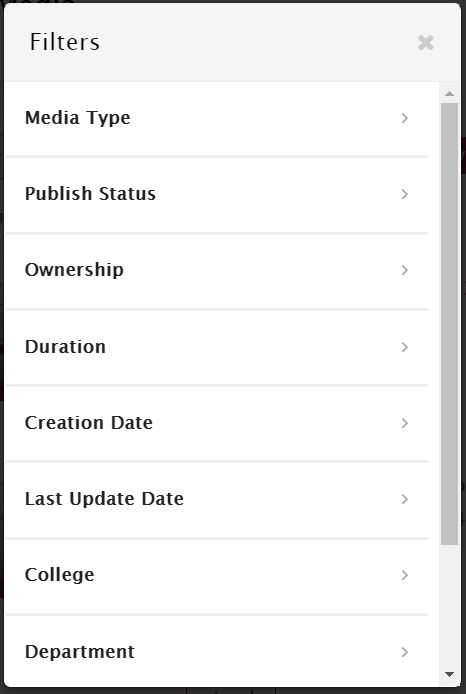
2. You can also Filter and Sort content of your searches
- Videos can be filter by publish status, media type, and whether or not you own the video
- Videos can be sorted by Most Recent, Views, Likes, Alphabetical order or Comments

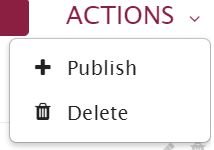
1. In "My Media", in Canvas, check the box next to each video you want to publish to the "Media Gallery"
2. Click "Actions" -> "Publish"
- NOTE: You can only publish if you have entered a Description on the Edit Video page. If you do not have a description for the video you will receive an error. If you get an error, add a description and try publishing the video again.
3. Then, choose whether you want the video as "Private" or to "Publish" the video to the "Media Gallery"
4. If you choose to publish to the "Media Gallery", then you will be prompted to choose which gallery you wish to publish to
5. The last and most important step, click "Save" at the bottom of the list of options

Playing a Video
1. In "My Media" or the "Media Gallery" inside Canvas, browse to media entry you want to view and click on the thumbnail or title
2. Then, click "Play" inside the media player
- NOTE: You can use options inside the media player such as volume control, caption selection, and full screen mode
Download a Video
1. In order to download, you must first enable downloads in "My Media"
- To enable downloading capability, navigate to "My Media", click a video, then click "Actions" -> "Edit"
- Click on the "Downloads" tab, check the box labeled "Source", then click "Save"

2. Choose the video you want to download, click the video to open it
3. Once open, click the arrow nexst to "Details", then "Download"
NOTE: You can only download videos that are not owned by you in the "Media Gallery" if the video's owner has enabled it to be downloaded.
For more information, visit the 4help website on Kaltura in Canvas for Instructors or Kaltura in Canvas for Students.
If you have any questions, do not hesitate to contact us.