

PDF Annotator
- Select File -> Open
- Browse to the PDF document you would like to open
- Select Open
- Alternative: You can also drag and drop the document you would like to open into PDF Annotator
1. Save the existing file - this will overwrite the existing file (if one exists)
Select File -> Save
2. Save the document that you have been editing to a new file - this will create a new file
Select File -> Save as
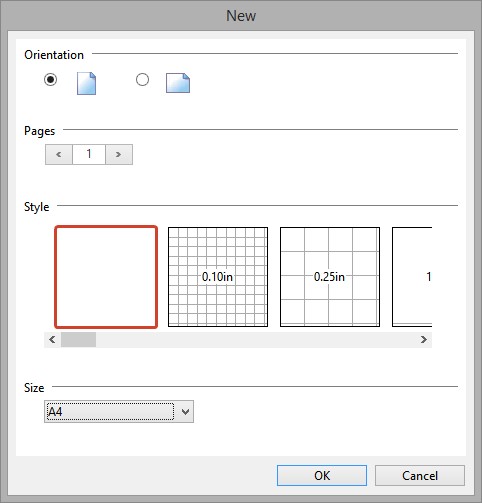
1. Select File -> New Document
2. Select the desired orientation (portrait/landscape), pages, background style (plain/graph etc), and size
In another application (word processing, web browser, etc)
1. Select the print command
2. Select the 'Print to PDF Annotator' printer
3. Follow through prompts to finish the print process
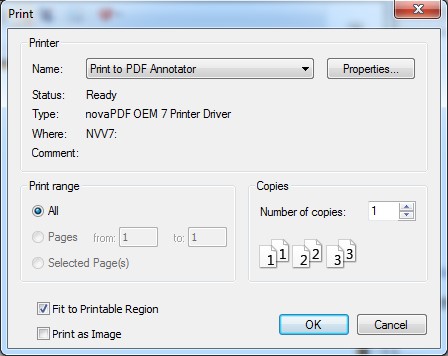
NOTE: PDF Annotator will generate a PDF document from whatever you printed and automatically display the newly generated document in a tab.

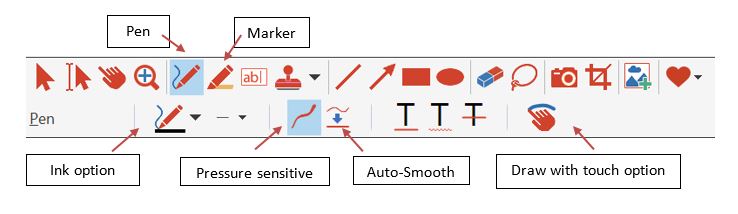
Using Pen/Marker
1. Select Pen or Marker (Highlighter) tool from the 1st level of the toolbar.
2. To automatically create straight lines, select the Auto-Smooth freehand to straight lines from the 2nd level of the tool bar.
NOTE: Auto-Smooth is usefull for underlining, striking out, or emphasizing text manually. It recognizes an attempt to draw a straight line. Auto-Smooth can also be activated temporarily by keeping the SHIFT key pressed while drawing.
3. For pressure sensitive writing, select the Pressure Sensitive icon from the 2nd level of the toolbar.
NOTE: The Pressure Sensitive option must be supported by your hardware in order to be used.
4. Move cursor to desired location, and start writing.
5. You may also change the color of the ink for your writing/highlighting.
Draw with Touch
1. Select Pen tool from the 1st level of the toolbar.
2. Select the icon Allow Drawing with Your Finger 

1. Select the text tool from the 1st level of the toolbar.
2. You may select any font type, color, background color, size for the text.
3. Move cursor to desired location, left click, and start typing within the text box.
4. Adjusting Heigth: The height of the text field automatically adjusts as you enter text.
5. Ending text entry: You can end your text entry by pressing the ESC key or by clicking outside of the test field.
6. Editing text: You can select the annotation by double clicking on the text and begin editing. You can end editing by pressing ESC or clicking outside the text field.
NOTE: Stamps are image icons that can be inserted into the document

1. Select Stamp tool from the 1st level of the toolbar
2. Select the desired stamp icon from the drop down menu
![]()
3. Click anywhere in the document and the stamp will be placed there
4. After the Stamp is inserted, you can move and resize the object
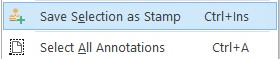
NOTE: You can also save your annotation as a stamp by Edit -> Selection -> Save as stamp which enables you to create a stamp and save it in the stamp image gallery.
Erasing Annotations
NOTE: This action enables ou to erase a single annotation. This CAN be undone.
1. Select the eraser tool from the 1st level of the toolbar, then click on the annotation you wish to be erased.
2. Alternatively, tablet PC users can also use the back end of their stylus as an eraser. If a pen or maker is selected as the current tool, erasing can also be done by repeatedly crossing out an area.

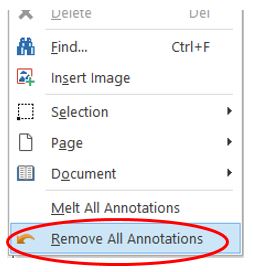
Melting or Removing all Annotation
NOTE: The melting/removing action enables you to merge all annotations into the document. This CANNOT be undone. After performing this action, you will no longer be able to edit annotations.
1. Select Edit -> Melt All Annotations
2. Select Edit -> Remove All Annotations
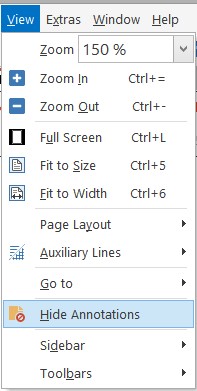
Hiding Annotation
1. This is used to toggle between hiding and un-hiding all annotations in the document
2. Select View -> Hide Annotations
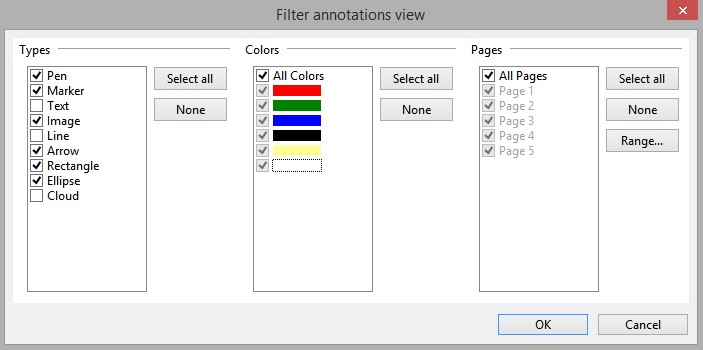
NOTE: Filtered annotations will only display a subset of your annotations in the sidebar. Annotations can be filtered by type, color, or page number.
1. To open the "Annotations" tab, click on the  button in the upper left hand corner
2. Select the "Filter" icon ![]() under the "Annotations" tab
under the "Annotations" tab
3. Select the types, colors, and pages you would like to filter and click "OK"
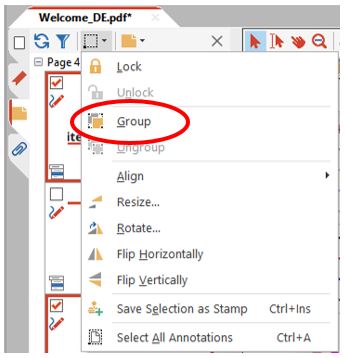
1. Select the "Annotations" tab in the upper left hand corner
2. Select annotations you would like to group or lock by placing a check mark in the boxes beside them
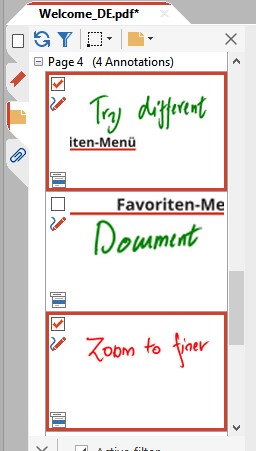
3. Select the "Selected Annotations" icon
4. Select "Group" or "Lock" to group or lock selected annotations
1. Select the objects or annotations using the selection tool
2. Adjust the borders of the size you prefer
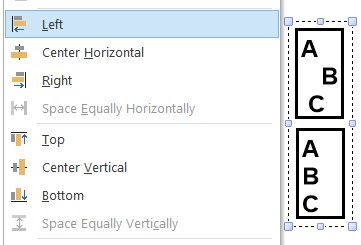
3. To align multiple objects or annotations on a straight line
a. Select the objects or annotations using the selection tool
b. Select Tool -> Tool Style -> Left/Center/Right/Top/etc
NOTE: PDF Annotator 5 comes with an added transparent toolbox that allows for switching between recently used tools.

1. Tap or a single click gives you a shortcut menu for recently used tools (bottom right-hand corner)
2. Right click on the transparent tool (or long tap) opens a menu with recently used tools
3. The transparent toolbox can be customized to be visible in regular and/or full screen mode; it can also be moved around by selecting and dragging it across the screen
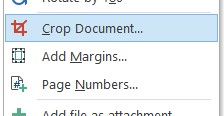
1. Select Edit -> Document
2. Choose whether to Crop Document/Add Margins/Page Numbers
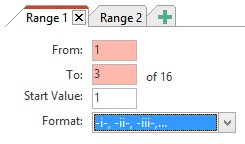
1. Select Edit -> Document -> Page Numbers
2. Adujst page numbers in ranges by selecting the  tab
tab
3. You may change the style numbering by selecting "Format"
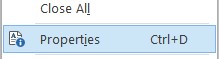
1. To modify or view document properties such as the file properties, PDF title, Keywords, Author, etc,
2. Select File -> Properties
3. Make or view adjustments of the properties for the "General" or "Security" tab
NOTE: Configuring keyboard shortcuts allows you to set desired shortcuts for specific comands
1. Select Extras -> Settings
2. Scroll down to the "Preference" menu and select "Shortcuts"
3. Select the command you want to set the keyboard shortcut from the listed items
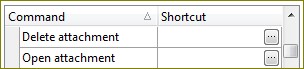
4. Select the "Open Shortcut Editor" button  at the end of the command to set a shortcut
5. In the "Edit Shortcut" window press any key or combination of keyboard keys to input a value for the shortcut e.g. SHIFT + E
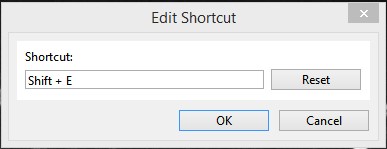
6. Select "OK" when done